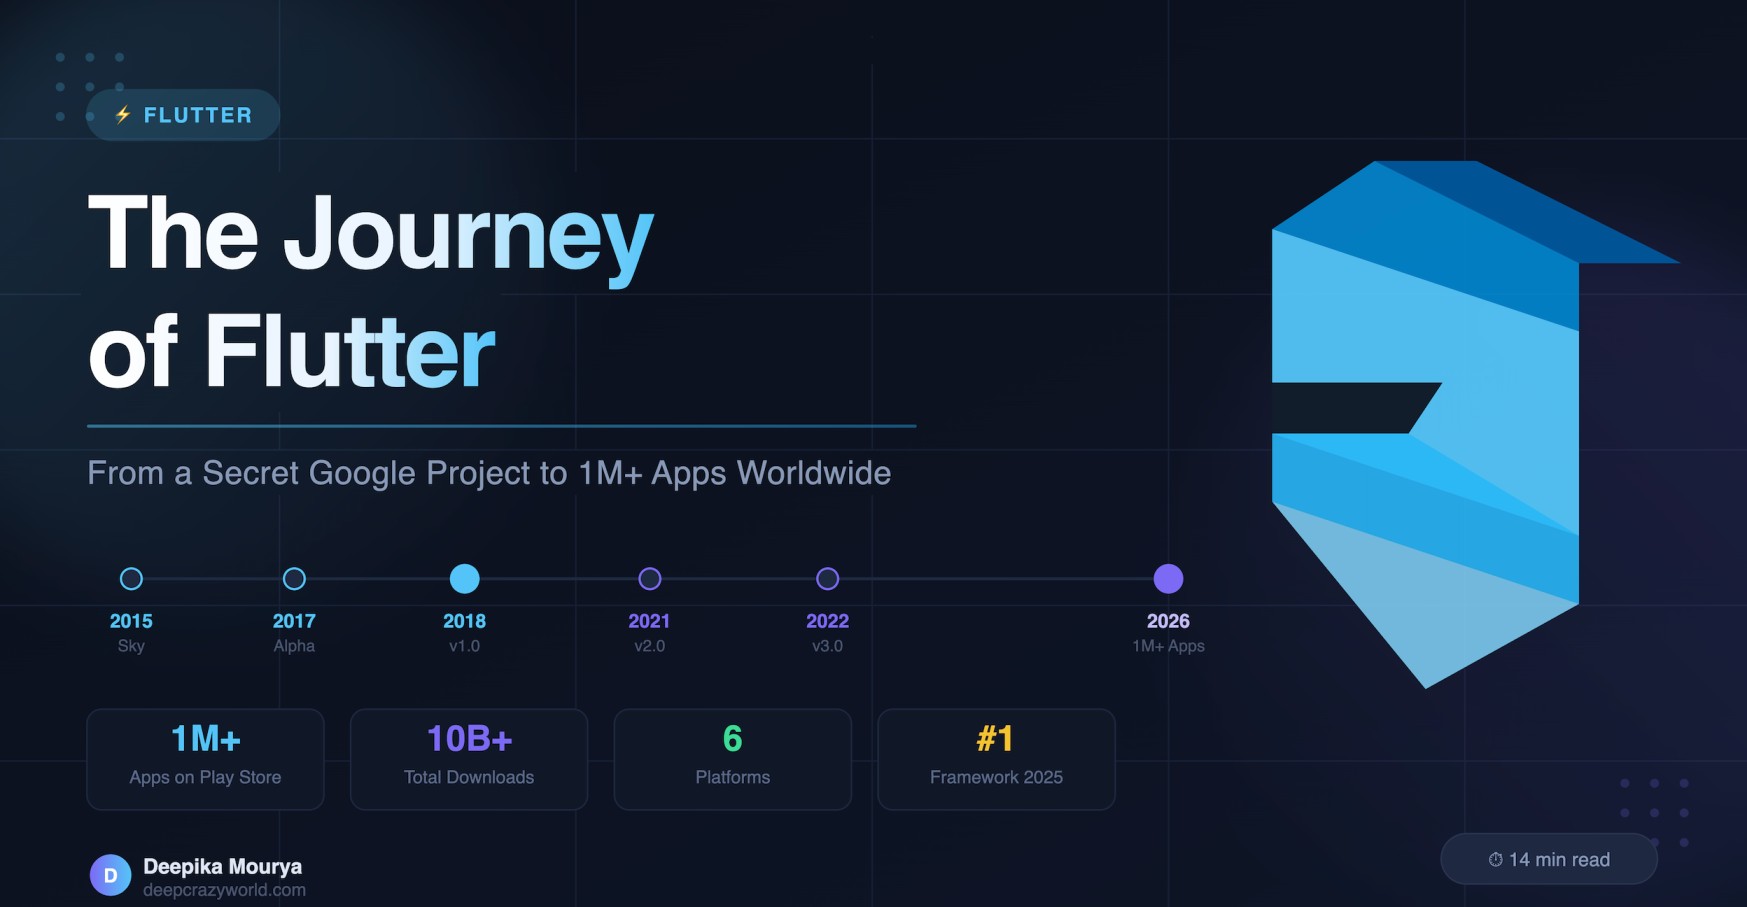
Facebook Twitter Instagram
    DeepCrazyWorld
    Facebook Twitter Instagram Pinterest YouTube
    • FLUTTER
      • FLUTTER APP
        • QRCode
        • Quiz App
        • Chat GPT
        • PDF App
        • News App
        • Fitness App
        • Weather App
        • BMI Calculator
        • GAME APP
        • Ecommerce App
        • wallpaper App
        • Finance app
        • Chat App
        • Wallet App
        • Taxi App
        • Quran app
        • Music player app
      • FLUTTER UI
        • Splash Screen
        • Onboarding Screen
        • Login Screen
        • Card Design
        • Drawer
    • PROJECT
      • Android Projects
      • College Projects
      • FLUTTER APP
      • Project Ideas
      • PHP Projects
      • Python Projects
    • SOURCE CODE
    • ANDROID
      • ANDROID APP
      • GAME APP
      • ANDROID STUDIO
    • MCQ
      • AKTU MCQ
        • RPA MCQ
        • COA MCQ
        • HPC MCQ
        • SPM MCQ
        • Renewable Energy All MCQ
        • Data Compression MCQ
        • Data Structure MCQ
        • Digital Image Processing MCQ
        • Software Engineering MCQ
        • Machine Learning MCQ
        • Artificial Intelligence MCQ
      • D PHARMA MCQ
        • Pharmaceutics – I MCQ
        • Pharmacognosy MCQ
        • Pharmaceutical Chemistry MCQ
        • Biochemistry and Clinical Pathology MCQ
        • Human Anatomy and Physiology MCQ
        • Heath Education and Community Pharmacy MCQ
    • INTERVIEW QUESTIONS
      • Flutter Interview Questions
      • INTERVIEW QUESTIONS
      • Python Interview Questions
      • Coding ninjas solution
    • MORE
      • WORDPRESS
        • SEO
        • TOP 10 WORDPRESS THEME
      • PRODUCTIVITY
      • Program
      • QUOTES
    DeepCrazyWorld
    Home»FLUTTER»Flutter ListView – A Guide to Creating Dynamic Lists with flutter
    FLUTTER

    Flutter ListView – A Guide to Creating Dynamic Lists with flutter

    DeepikaBy DeepikaApril 16, 2023Updated:November 9, 2023No Comments14 Mins Read

    Flutter ListView – A scrollable list of widgets may be displayed in your app with the potent widget Flutter ListView. It is a flexible tool for showing lists of any kind, from straightforward text to intricate dynamic material. Any Flutter app must include a ListView because it enables seamless user interaction and content navigation.

    Flutter ListView example with source code – A ListView is really just a collection of widgets that can be scrolled either horizontally or vertically. For showing lengthy lists of stuff, such as contacts, goods, or articles, this may be quite helpful. We’ll take a thorough look at the Flutter ListView widget in this blog article and learn everything there is to know about it.

    <img decoding=
    Flutter ListView example with source code

    Table of Contents

    Toggle
    • ListView’s importance in developing Flutter apps
    • Creating a Basic ListView
    • Using ListView.builder
      • Using ListView.builder to create a ListView
      • Building a Horizontal ListView
      • Adding Separator to ListView
      • Creating a Nested ListView
      • Wrapping ListView in SingleChildScrollView
      • Adding Background Color to ListView
    • Controlling Scroll and Navigation in Flutter ListView
      • Navigating to a Specific Index in ListView
      • Using ListView and Infinite Scroll
      • ListView’s new Load More on Scroll feature
      • Pagination implementation in ListView
      • Adding Filter and Search Functionality to ListView
    • Optimizing Flutter ListView Performance
      • Improving ListView Performance
      • Limit the number of items in your ListView
      • Understanding ListView vs Column
      • Creating Space Between ListView Items
      • Using Efficient Data Fetching Methods in ListView
    • Conclusion
        • Related Articles:
      • READ MORE

    ListView’s importance in developing Flutter apps

    The creation of Flutter apps is essential to ListView. It offers a simple method to manage big datasets and enables developers to easily design sophisticated and dynamic user interfaces.

    The ability to present a lot of data in a little amount of space is one of the main advantages of utilising ListView. Due to the limited screen space on mobile devices, this makes it suitable.

    Additionally, ListView has a number of built-in capabilities that make it simple to alter the widget’s design and functionality. For instance, you may alter the list’s orientation and scrolling behaviour as well as the items’ colour and style. You can even include separators between the list’s items.

    Creating a Basic ListView

    To create a basic ListView in Flutter, you first need to import the necessary package:

    import 'package:flutter/material.dart';

    Next, you can create a new ListView widget and add children widgets to it:

    ListView(
      children: <Widget>[
        ListTile(
          leading: Icon(Icons.map),
          title: Text('Map'),
          subtitle: Text('Display a map'),
          trailing: Icon(Icons.arrow_forward_ios),
        ),
        ListTile(
          leading: Icon(Icons.photo_album),
          title: Text('Album'),
          subtitle: Text('View photos'),
          trailing: Icon(Icons.arrow_forward_ios),
        ),
        ListTile(
          leading: Icon(Icons.phone),
          title: Text('Phone'),
          subtitle: Text('Make a call'),
          trailing: Icon(Icons.arrow_forward_ios),
        ),
      ],
    )

    In this example, we’ve created a ListView widget and added three ListTile children widgets to it. Each ListTile contains an icon, a title, a subtitle, and a trailing widget (in this case, an arrow icon).

    To customize the appearance of the ListView, you can use properties such as padding, backgroundColor, and shrinkWrap. You can also use the scrollDirection property to change the direction of the list, and the physics property to change the scrolling behavior.

    You can also use the ListView widget inside a Column widget to add other widgets alongside it, such as headers or footers. To do this, simply wrap the ListView widget inside the Expanded widget to allow it to take up the available space:

    Column(
      children: <Widget>[
        Text('Header'),
        Expanded(
          child: ListView(
            children: <Widget>[
              ListTile(
                leading: Icon(Icons.map),
                title: Text('Map'),
                subtitle: Text('Display a map'),
                trailing: Icon(Icons.arrow_forward_ios),
              ),
              ListTile(
                leading: Icon(Icons.photo_album),
                title: Text('Album'),
                subtitle: Text('View photos'),
                trailing: Icon(Icons.arrow_forward_ios),
              ),
              ListTile(
                leading: Icon(Icons.phone),
                title: Text('Phone'),
                subtitle: Text('Make a call'),
                trailing: Icon(Icons.arrow_forward_ios),
              ),
            ],
          ),
        ),
        Text('Footer'),
      ],
    )

    In this example, the ListView widget is enclosed in an Expanded widget, and the Column widget has been given a header and a footer. As a result, ListView is able to occupy the whole area between the header and footer widgets.

    Using ListView.builder

    You might not always be aware of the precise number of items that will be visible in your ListView. The ListView.builder widget is useful in this situation. It is more effective to use ListView.builder to make a scrollable list of widgets with a predetermined number of elements.

    Using ListView.builder to create a ListView


    The itemCount parameter must be used to define the amount of items you wish to display when creating a ListView with ListView.builder. Additionally, you must create an itemBuilder function that returns a widget for each item in the list:

    ListView.builder(
      itemCount: 10,
      itemBuilder: (BuildContext context, int index) {
        return ListTile(
          title: Text('Item $index'),
        );
      },
    )

    The ListView in this example has 10 items, each of which is represented by a ListTile widget with a title that shows the item’s index.

    Building a Horizontal ListView

    ListView always presents things vertically by default. However, you may force it to show things horizontally by using the scrollDirection property:

    ListView.builder(
      scrollDirection: Axis.horizontal,
      itemCount: 10,
      itemBuilder: (BuildContext context, int index) {
        return Container(
          width: 100.0,
          child: Card(
            child: ListTile(
              title: Text('Item $index'),
            ),
          ),
        );
      },
    )

    In this example, we’ve set the scrollDirection property to Axis.horizontal, and we’ve wrapped each ListTile in a Card widget to give it a more polished appearance.

    Adding Separator to ListView

    You can also add separators between the items in your ListView using the Divider widget:

    ListView.builder(
      itemCount: 10,
      itemBuilder: (BuildContext context, int index) {
        return Column(
          children: <Widget>[
            ListTile(
              title: Text('Item $index'),
            ),
            Divider(),
          ],
        );
      },
    )

    In this example, we’ve added a Divider widget after each ListTile using a Column widget.

    Creating a Nested ListView

    You can also create a nested ListView within another ListView. Here is how:

    ListView.builder(
      itemCount: 10,
      itemBuilder: (BuildContext context, int index) {
        return Column(
          children: <Widget>[
            ListTile(
              title: Text('Item $index'),
            ),
            ListView.builder(
              shrinkWrap: true,
              physics: ClampingScrollPhysics(),
              itemCount: 3,
              itemBuilder: (BuildContext context, int subIndex) {
                return ListTile(
                  title: Text('Sub-item $subIndex'),
                );
              },
            ),
          ],
        );
      },
    )

    In this example, we’ve created a nested ListView within the parent ListView using a Column widget. We’ve also used the shrinkWrap property to wrap the child ListView tightly around its contents, and the ClampingScrollPhysics to limit the scrolling of the child ListView to the size of its contents.

    Wrapping ListView in SingleChildScrollView

    If you need to add a ListView to a screen that also contains other widgets, you can wrap the ListView in a SingleChildScrollView widget to ensure that the entire screen is scrollable:

    SingleChildScrollView(
      child: Column(
        children: <Widget>[
          Text('Header'),
          ListView.builder(
            shrinkWrap: true,
            physics: NeverScrollableScrollPhysics(),
            itemCount: 10,
            itemBuilder: (BuildContext context, int index) {
              return ListTile(
                title: Text('Item $index'),
              );
            },
          ),
          Text('Footer'),
        ],
      ),
    )

    To enable scrolling of the full screen if necessary, we’ve wrapped the “ListView” with a “SingleChildScrollView” widget in this example. Additionally, we’ve set the child ListView’s shrinkWrap property to true so that it uses just the space it needs, as well as its ‘NeverScrollableScrollPhysics’ property to prevent scrolling.

    The header, ListView, and footer widgets are often stacked one on top of the other using the Column widget. We can add more widgets to the screen while still retaining the ability to browse through the full material by enclosing the ListView widget in a Column widget. The header and footer portions of the screen are represented by the Text widgets at the top and bottom of the Column, respectively.

    Adding Background Color to ListView

    You can add a background color to your ListView by wrapping it in a Container widget and setting the color property:

    Container(
      color: Colors.grey[200],
      child: ListView.builder(
        shrinkWrap: true,
        physics: ClampingScrollPhysics(),
        itemCount: 10,
        itemBuilder: (BuildContext context, int index) {
          return ListTile(
            title: Text('Item $index'),
          );
        },
      ),
    )

    In this example, we’ve encased the ListView in a Container widget and given it a light grey backdrop by setting the colour attribute to Colors.grey[200]. By changing the value of the colour attribute, you may use whatever colour you like.

    Because a ListView’s background colour is translucent by default, enclosing it in a Container widget enables you to change the background colour of the entire widget. This method may also be used to customise your ListView as necessary by adding borders, padding, or other elements.

    Controlling Scroll and Navigation in Flutter ListView

    ListView provides several built-in features that allow you to control the scrolling and navigation behavior of the widget. In this section, we’ll explore some common use cases for controlling scroll and navigation in ListView.

    Navigating to a Specific Index in ListView

    You can use the scrollTo method of the ScrollController class to navigate to a specific index in your ListView. First, you need to create a ScrollController and assign it to your ListView:

    final _scrollController = ScrollController();
    
    ListView.builder(
      controller: _scrollController,
      itemCount: 100,
      itemBuilder: (BuildContext context, int index) {
        return ListTile(
          title: Text('Item $index'),
        );
      },
    )

    In this example, we’ve constructed a ScrollController and used the controller attribute to bind it to our ListView.

    You may use the scrollTo function of the ScrollController class to go to a given index in the ListView:

    _scrollController.scrollTo(
      index: 50,
      duration: Duration(milliseconds: 500),
      curve: Curves.easeInOut,
    );

    In this illustration, we’ve used the scrollTo function to move the cursor to the ListView’s index 50. The scroll animation’s duration and curvature have also been set.

    Using ListView and Infinite Scroll


    As the user scrolls down the list, you might wish to add extra data to your ListView in some circumstances. It is referred to as “infinite scrolling.”

    Using the onEndReached attribute and a bool value to indicate if new data is being loaded, you may add limitless scrolling to your ListView:

    bool _isLoading = false;
    
    ListView.builder(
      itemCount: _data.length,
      itemBuilder: (BuildContext context, int index) {
        return ListTile(
          title: Text(_data[index]),
        );
      },
      onEndReached: () {
        if (!_isLoading) {
          setState(() {
            _isLoading = true;
          });
          // Load more data here
          // ...
          setState(() {
            _isLoading = false;
          });
        }
      },
    )

    In this illustration, the onEndReached property is being utilised to determine when the user has reached the end of the ListView. When this occurs, we load the new data and set the _isLoading flag to true to show that new data is loading. The _isLoading flag is reset to false once the data has been loaded.

    ListView’s new Load More on Scroll feature


    You may also include a “Load More” button in your ListView that displays when the user goes to the bottom of the list, which functions similarly to endless scrolling:

    bool _isLoading = false;
    bool _showLoadMore = true;
    
    ListView.builder(
      itemCount: _data.length + (_showLoadMore ? 1 : 0),
      itemBuilder: (BuildContext context, int index) {
        if (index == _data.length) {
          return _isLoading
              ? CircularProgressIndicator()
              : RaisedButton(
                  child: Text('Load More'),
                  onPressed: () {
                    setState(() {
                      _isLoading = true;
                      _showLoadMore = false;
                    });
                    // Load more data here
                    // ...
                    setState(() {
                      _isLoading = false;
                      _showLoadMore = true;
                    });
                  },
                );
        }
        return ListTile(
          title: Text(_data[index]),
        );
      },
    )

    The “Load More” button in this example appears when the user scrolls all the way to the end of the ListView. When the button is touched, we first signal that new data is loading by setting the _isLoading flag to true, and then we load the new data. After the data has been loaded, the “Load More” button is displayed once more, and the _isLoading flag is reset to false.

    Pagination implementation in ListView

    A typical method for displaying enormous datasets in pages or smaller portions is pagination. You may utilise pagination in Flutter by loading and showing data as the user scrolls through the pages of your ListView.

    To implement pagination in your ListView, you need to keep track of the current page number and the number of items per page:

    int _currentPage = 1;
    int _itemsPerPage = 10;
    List<String> _data = [];
    
    ListView.builder(
      itemCount: _data.length,
      itemBuilder: (BuildContext context, int index) {
        return ListTile(
          title: Text(_data[index]),
        );
      },
      onEndReached: () {
        setState(() {
          _currentPage++;
        });
        // Load more data for the next page
        // ...
      },
    )

    In this example, we’ve used the onEndReached property to detect when the user has scrolled to the end of the current page. When this happens, we increment the _currentPage variable and load more data for the next page.

    Adding Filter and Search Functionality to ListView

    You can also add filter and search functionality to your ListView to allow the user to search and filter the data displayed in the list.

    To implement search and filter functionality in your ListView, you can use a TextField widget to get the user input, and then filter the data based on the input:

    String _searchText = '';
    
    ListView.builder(
      itemCount: _data.length,
      itemBuilder: (BuildContext context, int index) {
        if (_searchText.isNotEmpty &&
            !_data[index].toLowerCase().contains(_searchText.toLowerCase())) {
          return SizedBox.shrink();
        }
        return ListTile(
          title: Text(_data[index]),
        );
      },
    )
    
    TextField(
      onChanged: (value) {
        setState(() {
          _searchText = value;
        });
      },
      decoration: InputDecoration(
        hintText: 'Search...',
      ),
    )

    In this example, we’ve used a TextField widget to get the user input for the search query. We’ve also added a check to the ListView.builder function that filters the data based on the search query. Finally, we’ve added an onChanged property to the TextField widget that updates the search query and re-renders the ListView with the filtered data.

    Optimizing Flutter ListView Performance

    ListView is a powerful widget for displaying lists of data in Flutter, but it can also be a source of performance issues if not used properly. In this section, we’ll explore some tips and tricks for optimizing the performance of your ListView.

    Improving ListView Performance

    To improve the performance of your ListView, you can use several techniques such as:Use ListView.builder instead of ListView when displaying large datasets
    Avoid using expensive widgets such as Image and VideoPlayer inside ListView items

    Limit the number of items in your ListView

    Implement pagination or lazy loading to reduce the amount of data displayed at once
    By following these best practices, you can ensure that your ListView is performant and provides a smooth user experience.

    Understanding ListView vs Column


    It’s important to understand the difference between ListView and Column in Flutter, as they are often used interchangeably but have different use cases.

    ListView is used when you have a large dataset that needs to be displayed in a scrollable list. ListView uses a ScrollPhysics object to handle scrolling and has built-in features such as onEndReached for infinite scrolling and scrollTo for navigating to specific indexes.

    On the other hand, we use a column when you have a smaller number of widgets that need to be displayed in a vertical layout. Column does not provide scrolling behavior and is typically used for laying out widgets such as forms, menus, and headers.

    Creating Space Between ListView Items

    You can create space between items in your ListView by using the Divider widget or by wrapping each item in a Container widget with padding or margin:

    ListView.builder(
      itemCount: 10,
      itemBuilder: (BuildContext context, int index) {
        return Container(
          padding: EdgeInsets.symmetric(vertical: 10),
          child: ListTile(
            title: Text('Item $index'),
          ),
        );
      },
    )

    In this example, we’ve wrapped each ListTile item in a Container widget with a vertical padding of 10 pixels. This creates space between each item in the ListView.

    Using Efficient Data Fetching Methods in ListView

    Fetching data efficiently is crucial for optimizing the performance of your ListView. Here are some tips for fetching data efficiently:

    • Use pagination or lazy loading to reduce the amount of data fetched at once
    • Use caching to reduce the number of network requests
    • Use asynchronous methods such as FutureBuilder to fetch data in the background and update the UI when the data is available

    By using these techniques, you can ensure that your ListView is responsive and provides a smooth user experience, even when dealing with large datasets.

    Conclusion

    This concludes the detailed explanation of the Flutter ListView widget. We’ve looked at a number of ListView-related topics in Flutter, such as how to construct a simple ListView, how to use ListView.builder, how to manage scroll and navigation, how to improve performance, and more. The look and behaviour of your ListView may be altered in a variety of ways as you experiment with different ListView setups. Don’t be scared to experiment with several settings to see which one suits your app the best.

    FlutterDesk must be the best option if you have an app concept and want to hire flutter developers to transform it into a practical application. Our team of Flutter developers has the ideal experience to handle any complicated business concept after developing more than 100 complete apps for companies across the world.

    Lastly, if you still have any questions regarding the Flutter ListView widget, feel free to ask in the comments section. We would be happy to be of help. Cheers! 😉

    Still, if you feel any difficult while dealing with Flutter app development projects, you can reach out to us or hire Flutter developers to outsource any of your app development project.

    Related Articles:

    • How to Install Flutter in windows 10
    • How to Setup Space Between Elements In Flutter 
    • Flutter Card Widget with Example
    • Integrating an API into a Flutter – Working with REST APIs
    • Create a simple splash screen in Flutter
    • Android Projects with Source Code
    • Flutter Interview Questions
    • School Database Management System Project 
    • Create A Simple Splash Screen UI design
    • Create Login Page UI Design and Animation For Flutter
    • Flutter Stepper Widget

    READ MORE

    Share. Facebook Twitter LinkedIn WhatsApp Telegram Pinterest Reddit Email
    Previous ArticleTop 10 Flutter Projects with source code For Startups
    Next Article The Best Flutter Stepper Widget : Build Multi-Step Forms

    Related Posts

    Implementing a Dynamic FAQ Screen UI in Flutter Using ExpansionTile

    FLUTTER 5 Mins Read

    Creating an Instruction UI Screen in Flutter Application

    FLUTTER UI 7 Mins Read

    Animated Backgrounds in Flutter: A Complete Guide

    FLUTTER 4 Mins Read

    How to Create Music Player UI screen with fully functional in flutter

    FLUTTER APP 3 Mins Read

    Leave A Reply Cancel Reply

    Recent Posts
    • Implementing a Dynamic FAQ Screen UI in Flutter Using ExpansionTile March 29, 2025
    • Creating an Instruction UI Screen in Flutter Application March 29, 2025
    • Animated Backgrounds in Flutter: A Complete Guide March 15, 2025
    • How to make Diary App using flutter stepwise using getx August 31, 2024
    • How to Create Music Player UI screen with fully functional in flutter August 30, 2024
    • How to make ListView Builder Ui in flutter with Source Code August 29, 2024
    • Create a TabBar View in flutter with fully functional stepwise August 28, 2024
    • How to create TabBar view in flutter with source code step wise August 27, 2024
    • How to make Heart rate measure app with Flutter stepwise August 26, 2024
    • How to make ChatGpt App in flutter with source code Stepwise August 25, 2024
    Facebook Twitter Instagram Pinterest YouTube
    • About
    • Contact
    • Disclaimer
    • Privacy Policy
    Copyright by DeepCrazyWorld © 2025

    Type above and press Enter to search. Press Esc to cancel.